Anniversary Card


Recently it was my mother and father-in-law's anniversary.  It is very easy to go to the local card shop and buy a card with mum and dad on the front, but I wanted to make them something special.

I used the 'Sweet and Sassy' and 'Layering Ovals' Framelits, which give a beautiful shape.


The 'Bundle of Love' speciality designer series paper is so beautiful that it makes any card look good.  I used the pink to layer and then the gold for the hearts.

I finished off by using the 'Happy Anniversary' sentiment from the 'Number of Years' photopolymer stamp set.


A very quick and easy make, but looks very effective when finished.


Thank you for visiting, see you again soon.

Vicky xx

Iconic Christmas & Ornamental Christmas


A few weeks ago I attended my regular craft session with my good friend Katrina.(http://katrinaspapercraftingcorner.blogspot.co.uk/)  We used the Iconic Christmas Photopolymer Stamp Set and the Ornamental Christmas Framelits Dies.  You can purchase these individually or can save a few pounds by purchasing the bundle, which is priced at £42.25.


We used various techniques to create the card and I wanted to share with you some of the techniques, which I am very new to.

So to start with, I mounted green and white card stock on to a blank note card, and then stamped the Christmas Tree using Garden Green ink onto another piece of green card stock.  

Then using the Versa Mark and Embossing Buddy (which prevents extra dust, powder etc sticking to your project), you simply rub the embossing buddy over your paper, and then using your chosen stamp, which you will have stamped onto the versa mark, you then stamp your card.

As you can see from the stamp, only some of the tree decorations are present, this means that the embossing powder will only stick where these decorations are and not over the whole tree.

Then using silver embossing powder, I covered my stamped tree, and then gently lifting the card up to remove all the excess powder, I then was ready to heat emboss.


The heat embosser gets very hot, and I love the magic of the embossing powder becoming shiny on your cardstock.


This was what the card looked like after embossing silver, I then did exactly the same process, but used a different stamp, which picks out different decorations, and this time used white embossing powder.


Doesn't it look beautiful.  I then put the card through the big shot to cut out the tree shape, along with a number of the decorations.  I then mounted this onto my note card, and very carefully using double sided foam dimensionals, I stuck down each individual decoration onto the Christmas tree.  


As you will see, this gives the Christmas tree a 3d effect, which looks really good. 


I then stamped my sentiment using the Versa Mark again to get a raised shiny effect, and finished off with a couple of reindeers in the corners.


I absolutely love how this turned out, it looks really effective and will make someone smile when they receive this at Christmas.

I then had a play and used the Marvelous Markers to create another Christmas card using the same stamp set.  I simply stamped the card and then sat and coloured - which I love doing.


I hope you have enjoyed this blog and found it interesting.  If you fancy having a go please do drop me a message, I'd love to hear from you.

Until next time, take care, Vicky xx


Host a Party...


If you host an event between 1 September and 31 October 2017, you can get a free stamp set with any qualifying order.

The 'Merry Patterns' Stamp Set is exclusive to this promotion and, with its candles, holly, jolly deer and classic sentiments, reflects all the cosiness and warmth you associate with the season.  Party hosts will get it for free if they reach the qualifying amount of £250!
If you are interested in hosting a Stampin' Up get together, then please do contact me.  I will provide catalogues, examples of the beautiful products Stampin' Up sell, and some of the amazing products you can make.  With Christmas just round the corner, what a great excuse to get the supplies needed to make your own cards, gift boxes, tags, etc.

Invite your Friends

Pick a date and I’ll provide party postcards to send out to your friends. You can use social media and texts to get the word out as well; share in the ways that work best for you!

Create, Share, Repeat

Put your new supplies and ideas to good use! Take advantage of Facebook and Pinterest as ways to share your ongoing projects and inspirations among friends and family.

Details:
  • Dates: 1 September – 31 October
  • Qualifying amount: £250 (catalogue price before shipping and handling)
  • Only one stamp set can be redeemed per order
  • Only the host of the order will receive the free stamp set
  • There is no limit as to how many qualifying orders you can place throughout the promotion
  • The Merry Patterns Stamp Set is not orderable outside this promotion


2017-2018 Autumn / Winter Catalogue Launch

Today is a very exciting day, as Stampin Up 2017-18 Autumn / Winter Catalogue launches. 


Here is a link to open the catalogue as a pdf file, or if you would like an actual copy then please do contact me and I will send you one.


There are some absolutely beautiful products, which I know are going to be very popular.  Go take a look and if you wish to order any of the items, then please do visit my website.


Pootler's Design Team - WEEK 5 - Quirky Critters


Well can you actually believe that this is week 5 of the Pootler's Design Team using Quirky Critters and sadly the last.  I have absolutely loved being part of the design team and really hope you have enjoyed my creations.

Week 5 of August also means that this is the last week of the school summer holidays.  Part of me is going to miss my three little cherubs so much, but the other part of me is looking forward to a bit of peace and quiet and some uninterrupted craft time...!


So this week I have created a card using 'Bundle of Love' speciality designer series paper.  It is absolutely gorgeous, and sadly the photos do not show just how gorgeous it is. 


I have layered the DSP on to 'Blushing Bride' cardstock, stamped using 'Blushing Bride' ink, and then mounted it all.  I also sponged the edges of the stamped image and added a 'Gold Faceted Gem' to finish it off.


I am going to be sending this card to a very special friend who has been such a wonderful help this week.

Thank you for visiting my blog, I really hope you have enjoyed the past 5 weeks projects. 

Take Care,
Vicky xx

Pootler's Design Team - WEEK 4 - Quirky Critters


Hello all.  Another week has passed very quickly, and there is now only 2 weeks left of the summer holidays.  As a mum of 3 children of different ages, it is very hard to please them all at the same time.  This week we have visited my sister and her children, seen my eldest play his first game of the season (he plays football), and a visit to Sundown Adventure Land, which was a great day out.


This week, I have created a birthday card, with a difference.  It isn't your normal open up, this just has a front and back.  I have used both Quirky Critters and Happy Birthday Gorgeous stamp sets to create a card for a child. 
The ink used is Tranquil Tide, Berry Burst and Fresh Fig.  Card stock is Tranquil Tide from the 2017-19 In Colors, and then Pear Pizazz and So Saffron, both of which are from the Subtles Collection.

I have also used the 1/4" Copper Trim which I love.


Lastly I have added a piece of Whisper White to the back, which I have sponged with Tranquil Tide, ready to have a birthday message written on it.


I look forward to using this card for a special little person.  Hope you like this as much as I do, and I look forward to sharing my last Pootles Design Team project with you next week.

Until then, take care.

Vicky xx

Showcasing the 'C' Word...

Today I had a rare few minutes to myself, so photographed some projects I have made recently with the theme of the 'C' word.  Yep you guessed it - CHRISTMAS!!!  There are only 17 weeks to go until Christmas, which is such a scary thought.  What's even more scarier is that a number of shops are already filling their shelves with tins of chocolates, toiletry gift set, etc.

The first card I want to share is one I made at my team retreat in June, using a technique called masking.  A very lovely fellow demonstrator by the name of Janice Thomson (http://www.stampinup.net/esuite/home/jazzledazzle/) cased this card.  I started off by placing a round post in note onto the middle of the card, and then using Peace this Christmas stamp set, I stamped around the post it note.  Once I had finished, I peeled off the post it note, and then stamped my sentiment in the middle.  I love the effect this has made.

A fellow demonstrator, who just happens to be a very close friend of mine, Katrina King (http://katrinaspapercraftingcorner.blogspot.co.uk/) runs weekly craft workshops, which is where I discovered Stampin Up.  Last week we used 'Winter Wonder Textured Impressions Embossing Folder'.  I haven't used the embossing technique very much, but I absolutely love the result it gives.  The wonderful thing about this particular embossing folder is that it is double sided so you can use either side.
This particular embossing folder is from the new Autumn & Winter catalogue, which is available from 1st September.  I then stamped the sentiment using 'Flurry of Wishes' stamp set which I then heat embossed, and ended with the 'Wink of Stella pen'.

Loving the copper embossing powder result - just seems to stand out better than the silver.

We also made another Christmas card using the 'Carols of Christmas' stamp set and the 'Card Front Builder Thinlits Dies' which again is featured in the Autumn Winter Catalogue, which you can purchase from on 1st September.  I really like how this card turned out.

Hope you have enjoyed this blog post and I look forward to sharing another with you very soon.
  Take Care, Vicky xx
                                           

Pootler's design team - WEEK 3 - Quirky Critters


Hello to you all.  Well the weather is very different this week to last week, so my children and I have visited a local farm, visited family and friends and played in the paddling pool.


It is now week 3 of the Pootler's Design Team for August and this week I fancied doing something a bit different.

I saw this frame in a local pound shop, removed the contents and have created, what I hope you agree, is a really cute birthday frame.


I have used Tangerine Tango cardstock as the back, then have used the Quirky Critters and
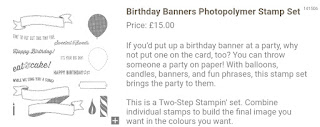
Birthday Banners Photopolymer stamp sets.


I also used the balloon punch, along with the Kraft Rope Trim (which I have just realised is now retired).  I had to fussy cut out the critter, and then mounted it all on to the card.  To finish it off, I added Rhinestone Basic Jewels to the bottom of the frame.  It catches the light really well and reflects the colours.


I am really pleased with how this has turned out.  Unfortunately because of the glass front it has been quite difficult to photograph.

If you would like to order any of the items I have used, please head over to my online shop - https://www2.stampinup.com/ECWeb/


I hope you have enjoyed this weeks project.  Have a great week and I look forward to sharing my next project with you all next week.

Take Care

Vicky x


Pootler's design team - WEEK 2 - Quirky Critters


Hello - I hope you are all enjoying the summer!  Here in Lincolnshire it is very wet and windy.  My family and I have just returned from 2 weeks in the sun so are currently feeling very hard done by as we can't show off our tans!!!

So, it is week 2 of the Pootler's Design Team and this week I have made an easel desk note pad and calendar. 

I used the 'You S'Nailed It' stamp and thought this would make a lovely gift for a young person who has passed their exams and is perhaps off to university or work and they could keep this on their desk.


Cardstock is Berry Burst and Powder Pink which are both from the 2017-19 In Color A4 Card Pack.  I then used the gorgeous DSP from Naturally Eclectic and finished off with the Rhinestone Basic Jewels.


I absolutely love the 2017-19 In Colors and how they compliment each other.  I also love that this lays flat, so can be put in an envelope and posted.


I think the snail is very cute.  Hope you like this weeks make - 3 more to go for August.  Hope to see you all again next week.

Take Care,

Vicky xx